D2ucfwpxlh3zh3.cloudfront.net Hijacker
D2ucfwpxlh3zh3.cloudfront.net Hijacker is injected on your browser by potentially unwanted program (PUP). Once it enters your computer, it begins to redirect you to unwanted websites such as Hohosearch or phishing microsoft page. It is used to carry on numerous scam which will not only damage your computer but also will steal your money as well. It always uses ads as the tools and one of the aspects indicating that your PC is infected is that your screen is flooding with numerous ads.

How D2ucfwpxlh3zh3.cloudfront.net Damage Your PC?
First, d2ucfwpxlh3zh3.cloudfront.net Hijacker related popups are fabricated with the information selected from your online activities or the most frequent key words used by users in order to tempt uses to click its links. Second, when you click the links, it will change your path to visit suspicious websites or to download the unwanted freeware and it got money from their owners. Finally, this websites will increase the chance for your PC to bring in virus, and the freeware will finally slows down your computer operation and the kill your computer system.
How D2ucfwpxlh3zh3.cloudfront.net Infect Your Computer?
D2ucfwpxlh3zh3.cloudfront.net Hijacker is usually brought by the third party program and in few cases, it will also come from the spam email or porn websites. And no matter from what way, you are unable to detect or discover it since its start up trigger is always hidden on the slim details. Nobody will focus on all the clauses terms. And it sometimes hides the options button in every corn of the sites so that the users can omit it. In this way, D2ucfwpxlh3zh3.cloudfront.net Hijacker opens the door to your PC.
If you don’t want to keep this d2ucfwpxlh3zh3.cloudfront.net Hijacker adware on your computer any more, please follow the removal instructions provided here. And it will help you to remove it without difficulty.
What Damages Will d2ucfwpxlh3zh3.cloudfront.net Hijacker Virus Caused?
- It makes your system perform slowly and even cause constant blue screen.
- It flood your hard drive with lots of junk files
- It installs more malicious programs into computer withot your knowledge
- It often redirects you to advertising pages or phishing websites
- It put your sensitive information and personal files at risk by opening backdoor for hacker
Step 1 - Uninstall D2ucfwpxlh3zh3.cloudfront.net From Win 10 /Win 8/Win 7/Vista/XP
Open Control Panel On Windows 10
- Click Start Menu >> click Settings
- Double-click System
- Click Apps & features >> Select D2ucfwpxlh3zh3.cloudfront.net or related harmful program >> Click Uninstall when the button appears
Open Control Panel On Win 8
- Click the File Explorer icon on the bottom left corner of desktop to open Libraries window.
- Click Desktop in right side bar >> double click Control Panel
Open Control Panel On Windows 7/Vista/XP
- Click Start Menu >> Click Control Panel
Removal Of D2ucfwpxlh3zh3.cloudfront.net From Control Panel
- In Control Panel, click Uninstall a program
- Click Installed On tab to find out D2ucfwpxlh3zh3.cloudfront.net and unwanted programs >> Click Uninstall button after selecting a program
Step 2 - Clear up malicious files of D2ucfwpxlh3zh3.cloudfront.net in Registry
- Press Windows + R keys at the same time to open Run window
- Type regedit and click OK :
- Locate and clear up the malicious registry files of D2ucfwpxlh3zh3.cloudfront.net virus:
HKEY_LOCAL_MACHINESOFTWAREMicrosoftWindowsCurrentVersionpoliciessystem “DisableTaskMgr” = ‘1'
HKEY_CURRENT_USER\Software\Microsoft\Windows\CurrentVersion\Uninstall\[virus name]
HKCU\SOFTWARE\Microsoft\Windows\CurrentVersion\Policies\Explorer\DisallowRun
HKEY_CURRENT_USERSoftwareMicrosoftInternet ExplorerDownload “CheckExeSignatures” = ‘no’
HKEY_CURRENT_USERSoftwareMicrosoftInternet ExplorerMain “Default_Page_URL”
HKEY_CURRENT_USERSoftwareMicrosoftWindowsCurrentVersionExplorerAdvanced “ShowSuperHidden” = 0'
HKEY_LOCAL_MACHINE\SOFTWARE\Wow6432Node\Microsoft\Tracing\Muvic_RASAPI32
HKCU\SOFTWARE\MICROSOFT\WINDOWS\CURRENTVERSION\EXT\SETTINGS\{RANDOM}

Reset your homepage page To Remove D2ucfwpxlh3zh3.cloudfront.net Virus
Reset Microsoft Edge Browser
- Select More (…) on the address bar, then Settings
- Under Open with, select A specific page or pages
- select Custom to enter the URL of page you want to set as homepage
Reset IE Browser
- Open Internet Explorer.
- Click the Tools button, and then click Manage add-ons.
- Click Toolbar and Extensions, then select D2ucfwpxlh3zh3.cloudfront.net and related extensions and click Disable
Reset Firefox Browser
- Click the menu button and choose Add-ons to open Manager tab
- In the Add-ons Manager tab, select the Extensions or Appearance panel.
- Select the D2ucfwpxlh3zh3.cloudfront.net and related add-on you need to remove.
- Click the Remove button.
Reset Chrome Browser
- Click the hamburger menu icon on the Google Chrome toolbar and then More tools.
- Select More tools from the menu.
- Select Extensions from the side menu
- Click the trash can icon link next to D2ucfwpxlh3zh3.cloudfront.net extension or related extension you wish to remove.
Download Automatic D2ucfwpxlh3zh3.cloudfront.net Removal Tool
If you are not able to remove D2ucfwpxlh3zh3.cloudfront.net virus manually from your computer system or you are getting any problem in removing this threat from your PC then you are advised to use Automatic Removal Tool. it is an advanced and powerful malware removal tool that can easily delete all kind of harmful threats and malware from your system. You can download the trial version of this tool to detect D2ucfwpxlh3zh3.cloudfront.net virus on your PC. Once you feel satisfied with the detection then you can purchase this program to remove the threat permanently.
How To Remove D2ucfwpxlh3zh3.cloudfront.net With Automatic Removal Tool
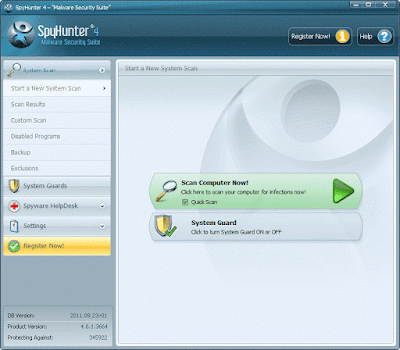
Step 1 - Install the software on your computer and click scan computer now button
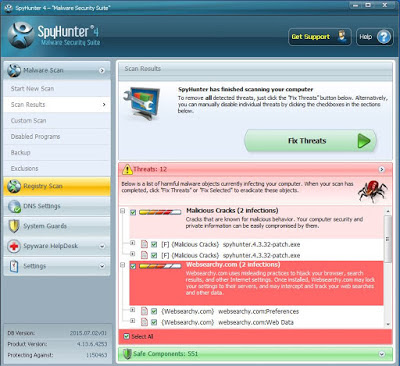
Step 2 - Click on Fix Threats Now to remove all detected viruses or malware.
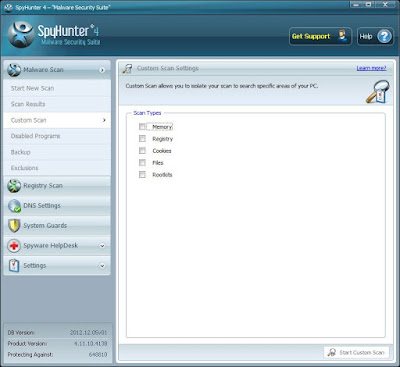
Step 3 - Use Custom Scan feature to scan any specific part of computer.
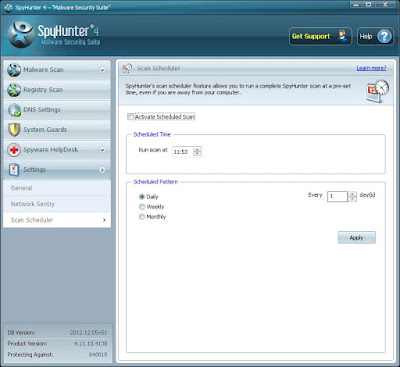
Step 4 - Configure Scan Scheduler option to ensure the safety of your PC.
Click here to learn more: - http://www.removepcvirusmalware.com
No comments:
Post a Comment